목차
이번에 mmdetection에서 제공하는 Instance Segmentation Network들의 성능을 비교해보려 합니다.
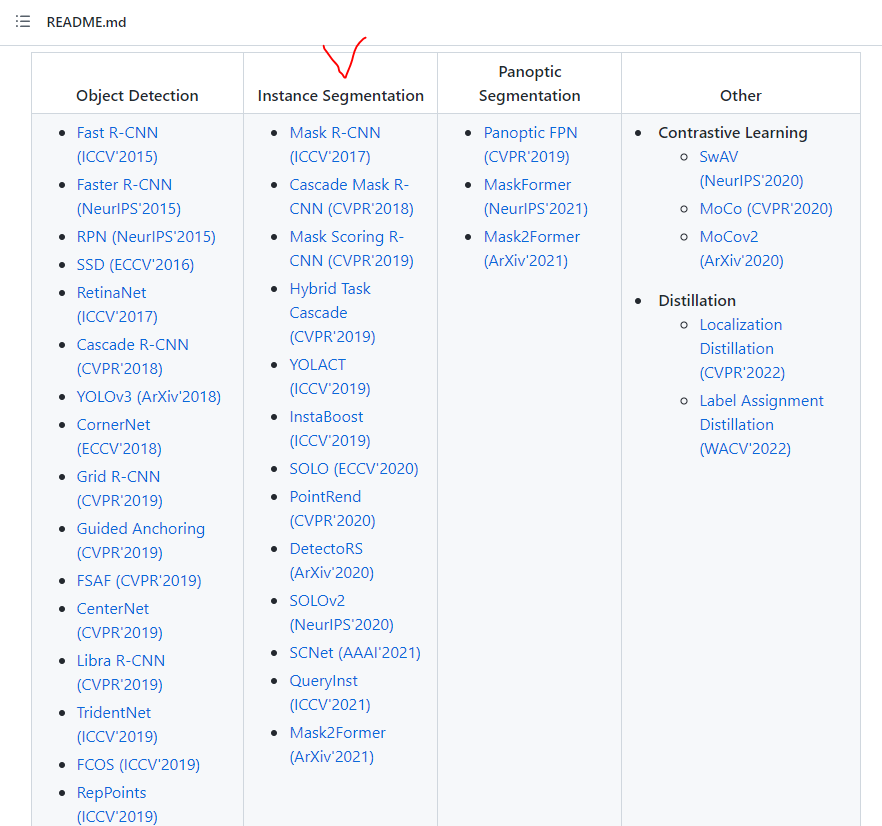
위와같이 mmdetection은 2022년 12월 03일 기준 13개의 Instance Segmentation Network를 툴박스에서 제공합니다.
거두절미하고 학습 시각화를 위한 wegiht&bias를 mmdetection에 연동하는 과정을 설명하겠습니다.
2022년 12월 현재 mmdetection github의 master branch가 2.26.0버전을 제공하므로 이를 기준으로 설명하겠습니다.
1. Prerequirement 설치
# pytorch 설치 for cuda 11.3
conda install pytorch==1.11.0 torchvision==0.12.0 torchaudio==0.11.0 cudatoolkit=11.3 -c pytorch
(cuda와 cudnn은 알아서 본인에게 맞는 버전을 설치해주세요)
2. mmdetection 패키지 설치
제 경우 mmdet source code를 직접 수정하기 때문에 source 설치를 진행합니다.
git clone https://github.com/open-mmlab/mmdetection.git
cd mmdetection
pip install -v -e .
# "-v" means verbose, or more output
# "-e" means installing a project in editable mode,
# thus any local modifications made to the code will take effect without reinstallation.
설치 끝! 간단합니다.
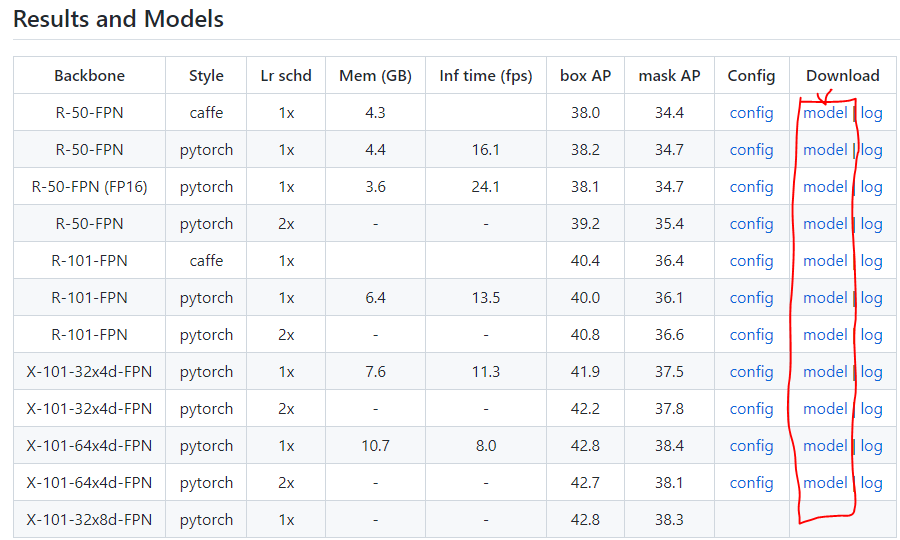
3. mmdetection archive에서 본인이 학습시키고자 하는 모델 다운로드
예를들어 본인이 mask-rcnn 모델을 학습하고자 한다면 아래 주소에 들어가서 model을 다운로드 받아주세요.
https://github.com/open-mmlab/mmdetection/tree/v2.25.0/configs/mask_rcnn
GitHub - open-mmlab/mmdetection: OpenMMLab Detection Toolbox and Benchmark
OpenMMLab Detection Toolbox and Benchmark. Contribute to open-mmlab/mmdetection development by creating an account on GitHub.
github.com
4. Training 코드에 wanDB Hook 추가
5. 전체 학습코드
from mmdet.apis import init_detector, inference_detector
import mmcv
import torch
import cv2
from mmdet.datasets.builder import DATASETS
from mmdet.datasets.coco import CocoDataset
from mmcv import Config
import copy
print(f"Setup complete. Using torch {torch.__version__} ({torch.cuda.get_device_properties(0).name if torch.cuda.is_available() else 'CPU'})")
print(cv2.__version__)
# config 파일을 설정하고, 다운로드 받은 pretrained 모델을 checkpoint로 설정.
config_file = 'configs/mask_rcnn/mask_rcnn_r101_fpn_2x_coco.py'
checkpoint_file = 'checkpoints/mask_rcnn_r101_fpn_2x.pth'
@DATASETS.register_module(force=True)
class VOCDataset(CocoDataset):
CLASSES = ('chicken',)
# config file 호출.
cfg = Config.fromfile(config_file)
###############################################################################################################################
from mmdet.apis import set_random_seed
# dataset에 대한 환경 파라미터 수정.
cfg.dataset_type = 'VOCDataset'
cfg.data_root = '/coco_output/'
# train, val, test dataset에 대한 type, data_root, ann_file, img_prefix 환경 파라미터 수정.
cfg.data.train.type = 'VOCDataset'
cfg.data.train.data_root = '/scratch/dohyeon/PREDIX/src/mmdetection/dataset/dataset_64/'
cfg.data.train.ann_file = 'annotations/train.json'
cfg.data.train.img_prefix = 'train'
cfg.data.val.type = 'VOCDataset'
cfg.data.val.data_root = '/scratch/dohyeon/PREDIX/src/mmdetection/dataset/dataset_64/'
cfg.data.val.ann_file = 'annotations/val.json'
cfg.data.val.img_prefix = 'val'
# class의 갯수 수정.
cfg.model.roi_head.bbox_head.num_classes = 1
cfg.model.roi_head.mask_head.num_classes = 1
# pretrained 모델설정(Mask R-CNN + resnet101).
cfg.load_from = 'checkpoints/mask_rcnn_r101_fpn_2x.pth'
# 학습 weight 파일로 로그를 저장하기 위한 디렉토리 설정.
cfg.work_dir = './mask_rcnn_r101_fpn_2x_dataset_64'
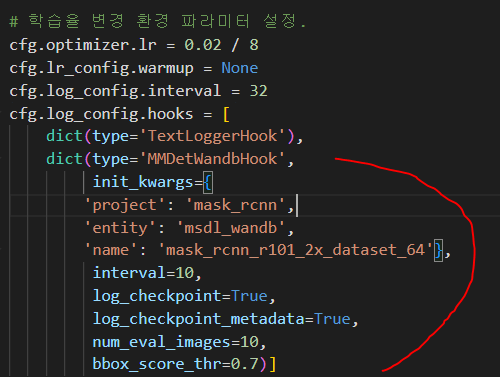
# 학습율 변경 환경 파라미터 설정.
cfg.optimizer.lr = 0.02 / 8
cfg.lr_config.warmup = None
cfg.log_config.interval = 32
cfg.log_config.hooks = [
dict(type='TextLoggerHook'),
dict(type='MMDetWandbHook',
init_kwargs={
'project': 'mask_rcnn',
'entity': 'msdl_wandb',
'name': 'mask_rcnn_r101_2x_dataset_64'},
interval=10,
log_checkpoint=True,
log_checkpoint_metadata=True,
num_eval_images=10,
bbox_score_thr=0.7)]
# epoch 변경 환경 파라미터 설정
cfg.runner.max_epochs=100
# workflow val 추가
cfg.workflow = [('train', 1), ('val', 1)]
# CocoDataset의 경우 metric을 bbox로 설정해야 함.(mAP아님. bbox로 설정하면 mAP를 iou threshold를 0.5 ~ 0.95까지 변경하면서 측정)
cfg.evaluation.metric = ['bbox', 'segm']
cfg.evaluation.interval = 10
cfg.checkpoint_config.interval = 10
# 두번 config를 로드하면 lr_config의 policy가 사라지는 오류로 인하여 설정.
cfg.lr_config.policy='step'
# Set seed thus the results are more reproducible
cfg.seed = 0
set_random_seed(0, deterministic=False)
cfg.gpu_ids = range(1)
cfg.device='cuda'
###################################################################################################################################
from mmdet.datasets import build_dataset
from mmdet.models import build_detector
from mmdet.apis import train_detector
# train, val Dataset 생성.
datasets = [build_dataset(cfg.data.train)]
if len(cfg.workflow) == 2:
val_dataset = copy.deepcopy(cfg.data.val)
val_dataset.pipeline = cfg.data.train.pipeline
datasets.append(build_dataset(val_dataset))
model = build_detector(cfg.model, train_cfg=cfg.get('train_cfg'), test_cfg=cfg.get('test_cfg'))
model.CLASSES = datasets[0].CLASSES
print(model.CLASSES)
##################################################################################################
#Training !!
import os.path as osp
mmcv.mkdir_or_exist(osp.abspath(cfg.work_dir))
# epochs는 config의 runner 파라미터로 지정됨. 기본 12회
train_detector(model, datasets, cfg, distributed=False, validate=True)
###################################################################################################
# inference 테스트 코드(선택사항).
# from mmdet.apis import show_result_pyplot
# import cv2
# checkpoint_file = '/scratch/dohyeon/mmdetection/tutorial_exps/epoch_12.pth'
# # checkpoint 저장된 model 파일을 이용하여 모델을 생성, 이때 Config는 위에서 update된 config 사용.
# model_ckpt = init_detector(cfg, checkpoint_file, device='cuda:0')
# # sample image에 적용.
# img = cv2.imread('/scratch/dohyeon/mmdetection/demo/2021-11-11-07_003.jpg')
# result = inference_detector(model_ckpt, img)
# show_result_pyplot(model_ckpt, img, result, score_thr=0.5)
Reference
'Computer Vision > MMdetection' 카테고리의 다른 글
| [mmdetection] roi_head 변경방법 (0) | 2022.09.08 |
|---|---|
| [mmdetection] custom training 방법 (개선) (0) | 2022.08.22 |
| [mmdetection] custom dataset 학습방법 (0) | 2022.08.20 |
| [mmdetection] 탐지 개체수 설정방법 (0) | 2022.08.09 |
| [mmdetection] bbox title 변경방법 (0) | 2022.07.20 |